AI Toolkit is an all in one training suite for diffusion models. I try to support all the latest models on consumer grade hardware. Image and video models. It can be run as a GUI or CLI. It is designed to be easy to use but still have every feature imaginable.
Support My Work
If you enjoy my projects or use them commercially, please consider sponsoring me. Every bit helps! 💖
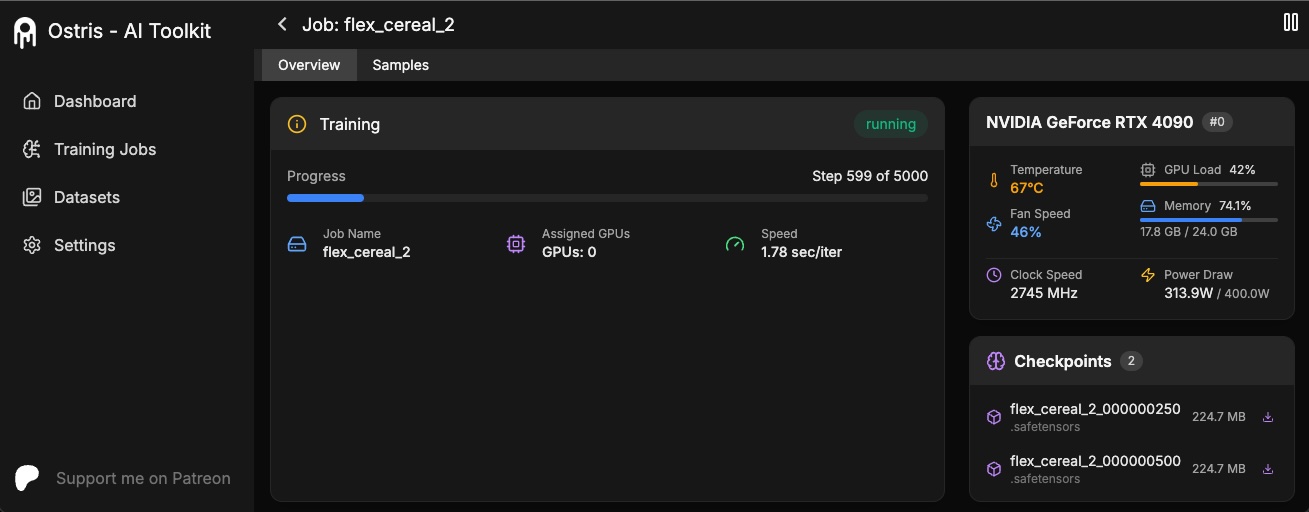
The AI Toolkit UI is a web interface for the AI Toolkit. It allows you to easily start, stop, and monitor jobs. It also allows you to easily train models with a few clicks. It also allows you to set a token for the UI to prevent unauthorized access so it is mostly safe to run on an exposed server.
Running the UI
Requirements:
Node.js > 18
The UI does not need to be kept running for the jobs to run. It is only needed to start/stop/monitor jobs. The commands below
will install / update the UI and it's dependencies and start the UI.
bash
1cd ui
2npm run build_and_start
You can now access the UI at http://localhost:8675 or http://<your-ip>:8675 if you are running it on a server.
Securing the UI
If you are hosting the UI on a cloud provider or any network that is not secure, I highly recommend securing it with an auth token.
You can do this by setting the environment variable AI_TOOLKIT_AUTH to super secure password. This token will be required to access
the UI. You can set this when starting the UI like so:
bash
1# Linux2AI_TOOLKIT_AUTH=super_secure_password npm run build_and_start
34# Windows5setAI_TOOLKIT_AUTH=super_secure_password &&npm run build_and_start
67# Windows Powershell8$env:AI_TOOLKIT_AUTH="super_secure_password";npm run build_and_start
You currently need a GPU with at least 24GB of VRAM to train FLUX.1. If you are using it as your GPU to control
your monitors, you probably need to set the flag low_vram: true in the config file under model:. This will quantize
the model on CPU and should allow it to train with monitors attached. Users have gotten it to work on Windows with WSL,
but there are some reports of a bug when running on windows natively.
I have only tested on linux for now. This is still extremely experimental
and a lot of quantizing and tricks had to happen to get it to fit on 24GB at all.
FLUX.1-dev
FLUX.1-dev has a non-commercial license. Which means anything you train will inherit the
non-commercial license. It is also a gated model, so you need to accept the license on HF before using it.
Otherwise, this will fail. Here are the required steps to setup a license.
FLUX.1-schnell is Apache 2.0. Anything trained on it can be licensed however you want and it does not require a HF_TOKEN to train.
However, it does require a special adapter to train with it, ostris/FLUX.1-schnell-training-adapter.
It is also highly experimental. For best overall quality, training on FLUX.1-dev is recommended.
To use it, You just need to add the assistant to the model section of your config file like so:
You also need to adjust your sample steps since schnell does not require as many
yaml
1sample:2guidance_scale:1# schnell does not do guidance3sample_steps:4# 1 - 4 works well
Training
Copy the example config file located at config/examples/train_lora_flux_24gb.yaml (config/examples/train_lora_flux_schnell_24gb.yaml for schnell) to the config folder and rename it to whatever_you_want.yml
Edit the file following the comments in the file
Run the file like so python run.py config/whatever_you_want.yml
A folder with the name and the training folder from the config file will be created when you start. It will have all
checkpoints and images in it. You can stop the training at any time using ctrl+c and when you resume, it will pick back up
from the last checkpoint.
IMPORTANT. If you press crtl+c while it is saving, it will likely corrupt that checkpoint. So wait until it is done saving
Need help?
Please do not open a bug report unless it is a bug in the code. You are welcome to Join my Discord
and ask for help there. However, please refrain from PMing me directly with general question or support. Ask in the discord
and I will answer when I can.
Gradio UI
To get started training locally with a with a custom UI, once you followed the steps above and ai-toolkit is installed:
bash
1cd ai-toolkit #in case you are not yet in the ai-toolkit folder2huggingface-cli login #provide a `write` token to publish your LoRA at the end3python flux_train_ui.py
You will instantiate a UI that will let you upload your images, caption them, train and publish your LoRA
image
Training in RunPod
If you would like to use Runpod, but have not signed up yet, please consider using my Runpod affiliate link to help support this project.
I maintain an official Runpod Pod template here which can be accessed here.
I have also created a short video showing how to get started using AI Toolkit with Runpod here.
Training in Modal
1. Setup
ai-toolkit:
git clone https://github.com/ostris/ai-toolkit.git
cd ai-toolkit
git submodule update --init --recursive
python -m venv venv
source venv/bin/activate
pip install torch
pip install -r requirements.txt
pip install --upgrade accelerate transformers diffusers huggingface_hub #Optional, run it if you run into issues
Modal:
Run pip install modal to install the modal Python package.
Run modal setup to authenticate (if this doesn’t work, try python -m modal setup).
Hugging Face:
Get a READ token from here and request access to Flux.1-dev model from here.
Run huggingface-cli login and paste your token.
2. Upload your dataset
Drag and drop your dataset folder containing the .jpg, .jpeg, or .png images and .txt files in ai-toolkit.
3. Configs
Copy an example config file located at config/examples/modal to the config folder and rename it to whatever_you_want.yml.
Edit the config following the comments in the file, be careful and follow the example /root/ai-toolkit paths.
4. Edit run_modal.py
Set your entire local ai-toolkit path at code_mount = modal.Mount.from_local_dir like:
Choose a GPU and Timeout in @app.function(default is A100 40GB and 2 hour timeout).
5. Training
Run the config file in your terminal: modal run run_modal.py --config-file-list-str=/root/ai-toolkit/config/whatever_you_want.yml.
You can monitor your training in your local terminal, or on modal.com.
Models, samples and optimizer will be stored in Storage > flux-lora-models.
6. Saving the model
Check contents of the volume by running modal volume ls flux-lora-models.
Download the content by running modal volume get flux-lora-models your-model-name.
Example: modal volume get flux-lora-models my_first_flux_lora_v1.
Screenshot from Modal
Modal Traning Screenshot
Dataset Preparation
Datasets generally need to be a folder containing images and associated text files. Currently, the only supported
formats are jpg, jpeg, and png. Webp currently has issues. The text files should be named the same as the images
but with a .txt extension. For example image2.jpg and image2.txt. The text file should contain only the caption.
You can add the word [trigger] in the caption file and if you have trigger_word in your config, it will be automatically
replaced.
Images are never upscaled but they are downscaled and placed in buckets for batching. You do not need to crop/resize your images.
The loader will automatically resize them and can handle varying aspect ratios.
Training Specific Layers
To train specific layers with LoRA, you can use the only_if_contains network kwargs. For instance, if you want to train only the 2 layers
used by The Last Ben, mentioned in this post, you can adjust your
network kwargs like so:
The naming conventions of the layers are in diffusers format, so checking the state dict of a model will reveal
the suffix of the name of the layers you want to train. You can also use this method to only train specific groups of weights.
For instance to only train the single_transformer for FLUX.1, you can use the following:
ignore_if_contains takes priority over only_if_contains. So if a weight is covered by both,
if will be ignored.
LoKr Training
To learn more about LoKr, read more about it at KohakuBlueleaf/LyCORIS. To train a LoKr model, you can adjust the network type in the config file like so: